2014-12-06

Level Up - Android Dev: The default emulator is horrendously slow, use Genymotion!

Many years back when I built and published my first Android apps, I only tested them on the default emulator provided by Google. And, even now, the default emulator is still too slow for my liking. It doesn't allow me to properly test apps. So, I purchased physical devices so that I would never have to touch the Android emulator again.

Genymotion provides a different take on the Android emulator. I've known about it for at least a year, but never got around to trying it because of my really bad experience with the default emulator. I've always heard that it was much faster than Google's implementation, but I didn't think an Android emulator could ever be fast enough for me compared to my physical devices.

I'm always learning something new, and today was finally time for me to learn more about Genymotion and test just how much better it is.

Results: Excellent! So much of a great experience that I had to write this blog post about it! I should have tried Genymotion when I first heard about it, and this is my message to all Android devs to also try it out now!

Sidenote: I was going to compare the default emulator with the Genymotion emulator side-by-side, but it was taking too long to load for me, whereas Genymotion startup was a breeze of fresh air. It runs without any lag. It runs faster than my old API 17 device.

Another great benefit is that Genymotion provides system images for many of the most popular devices, including Samsung Galaxy, Samsung Note, HTC One, Nexus, and more. And, they have a very convenient plugin for Android Studio to launch the emulator.

TLDR: It's fast. I have to make sure I stress that because I didn't believe how fast it would be. Genymotion's Android emulator is much faster and better experience than the default Android emulator.


Here, I even saved enough time to write a quick walkthrough for getting started. ;)


  1. Go to Genymotion.com, click "Get Genymotion".
  2. Download the free version, you'll have to sign up and confirm your email. (It's quick and it's worth it!)
  3. Install it along with VirtualBox. For Windows users, they can bundle the two together in the download. For other, you'll have to install VirtualBox separately.
  4. If you try to run it now, you might get an error that says "genymotion virtualization engine not found. Unable to load VirtualBox engine". So, just restart your computer and that fixed it for me. Some others had to enable the virtualization feature in the BIOS.
  5. Run! Fast!
  6. Now, you can click run in Android Studio and you will see an option to load the app in the Genymotion emulator that is running.

Bonus: How to Install the Genymotion Plugin for Android Studio (and, the first time you click on the installed plugin button, you'll have to add the path to where you installed it. Windows default is "C:\Program Files\Genymobile\Genymotion". Mac default is "/Applications/Genymotion.app")
~ Danial Goodwin ~


2014-12-05

Level Up - Android Studio: How to Boost Productivity By Auto-Generating Getters and Setters

A best practice in Java is to encapsulate field variables by making them private and creating a "getter" and "setter" for each of them, as needed. Doing this with many fields can be a lot of boilerplate code to write. But, thankfully, modern IDEs, like Android Studio provide ways to auto-generate code so that you don't have to manually write it.

For example, if you have a class like the following:

public class MyClass {
    private int mId;
    private String mName;
}

Instead of manually writing each accessor (getter) and mutator (setter), go to the menu and click Code->Generate.. (hotkey `alt+insert), then choose the "Getter and Setter" option.

Done. That was fast. And, it will be just as fast with 20+ fields also.

But, wait! By default, Android Studio will include that "m" prefix (stands for "member" variable) in each of the generated method names, so you'll have method names like "setmId" and "getmId". There is a quick permanent fix for this also!

Go to File->Settings->Code Style->Java->Code Generation, then type a single "m" into the "Field", "Name prefix" field. Hit apply, then you are gone. All future code generations will take those "m" prefixes for field into account. Here's a screenshot to what this sentence means visually.

So easy to save a lot of time with Android Studio

That's it for this post. There are lots of other useful code generators also. If you are doing mindless work, it's probably been automated (or should be). ;)

~ Danial Goodwin ~


2014-11-17

Level Up - Android: How to Root Nexus 4 on Android Lollipop 5.0 (Easy)

In my last post, I explained how to flash Android Lollipop 5.0 system image to Nexus 4. After I did that to my own device, the next thing I did was root it, using fewer steps than that other post. ;)

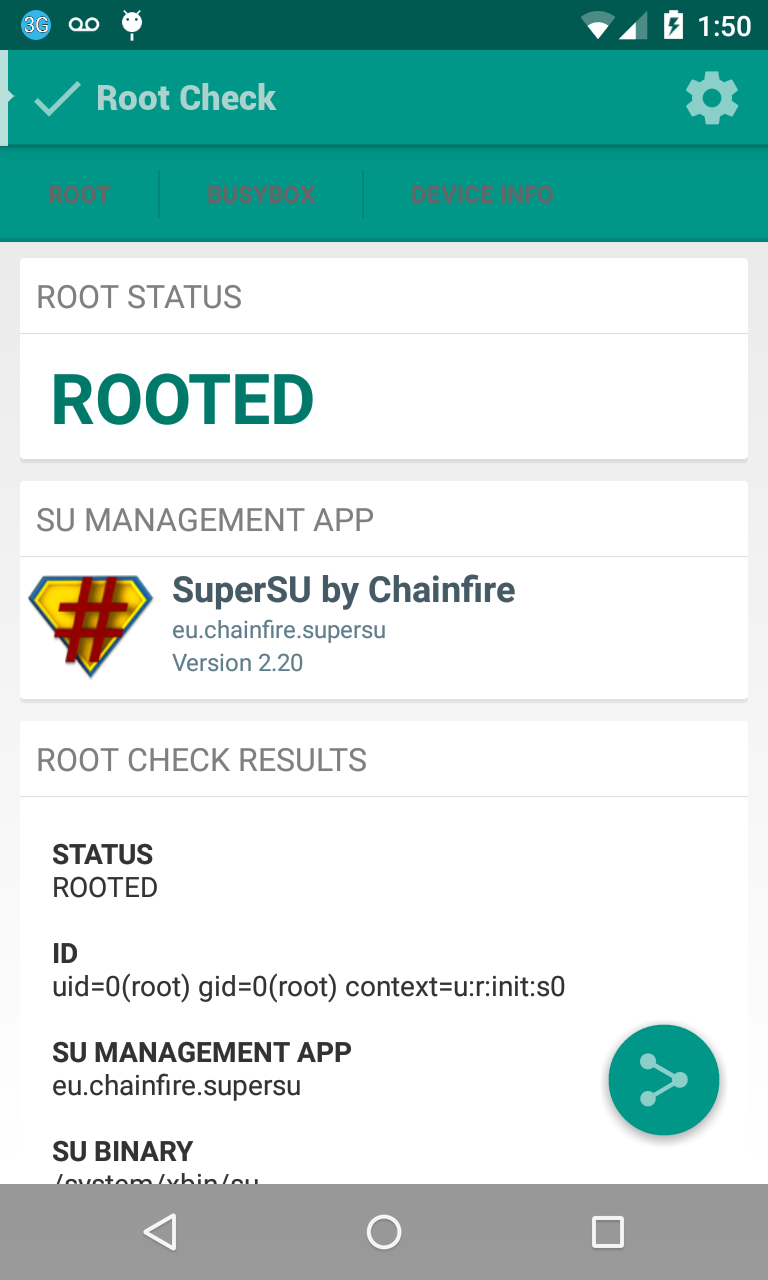
Rooted Nexus 4 on Android Lollipop 5.0

This will be a quick walk-through for the steps I took to root my Nexus 4. These directions are extended from the site with the great "CF-Auto-Root" tool that we will use.

Prerequisites:

  1. I assume that your bootloader is unlocked. If not, please see my previous post for how to unlock the bootloader.
  2. I assume you have `adb` added to your environment variable PATH. If not, please see my previous post.
  3. I assume you are running Windows, but Max and Linux users will be able to use these general directions also.


Walk-though for rooting the Nexus 4:


  1. Download the LGE Nexus 4 Android 5.0 file from http://autoroot.chainfire.eu/#fastboot
  2. Unzip the file. You should see two folders and three files in that folder, one should be called "root-windows.bat".
  3. Connect your Nexus 4 device to computer, then run `adb reboot-bootloader` in your computer's terminal. This will bring your device to the "fastboot" mode.
  4. Make sure again that your bootloader is unlocked before proceeding (label found at bottom-left).
  5. Open your computer's terminal to where you downloaded and unzipped the file, and run `root-windows` (Mac and Linux users use your own variant). You should see a red Android if the process is working.

Congrats! When the script is done, it will reboot your device and your Nexus 4 will be rooted!

This process will install the Root Check app so that you can verify a successful root.

More info:
  • I didn't have any trouble using these directions for rooting my Nexus 4, so if you have any troubles with the steps, then I'll try to help in my limited capacity.
  • Previously, when I was running Android 4.4 rooted, I used ES File Explorer to browse the root directories. But, it didn't work in Android 5.0, so instead I am now using the Root Browser app successfully.

~ Danial Goodwin ~


Level Up - Android: How to Flash (Upgrade) Nexus 4 to Android Lollipop 5.0 (Easy)

If you have a Nexus 4, then you can have Android Lollipop now! Google recently released the factory image, and I'm now successfully running it (with root, which will be explained in a later post).

Nexus 4 running Android Lollipop 5.0
This will be a short walk-through because I assume you already have the tools needed, but just need the steps to get the flash done. If you have any questions, then please write a comment and I will update as necessary.

  1. Download Android Lollipop 5.0 factory image: https://developers.google.com/android/nexus/images#occam
  2. Uncompress the file, possibly twice. I used 7-zip. You should see six files there, including a zip, which you do not have to unzip.
  3. Make sure `adb` is in your PATH environment variable, which can be found in %android-sdk%/platform-tools/. Also, you will need `fastboot.exe` from that same folder in your PATH. (I assume you already have the Android SDK and you know what I mean by "Advanced system settings"->Environment Variables->PATH.)
  4. Connect your Nexus 4 device to computer, then run `adb reboot-bootloader` in your computer's terminal. This will bring your device to the "fastboot" mode.
  5. At the very bottom-left, you should be able to see whether your bootloader is locked or unlocked. It must be unlocked to flash a new system image. If unlocked, you're good, go to the next step. If locked, then run `fastboot oem unlock`. WARNING: Unlocking will erase all data.
  6. Open your computer's terminal to where you downloaded and uncompressed the files, and run `flash-all`. That command will run the "flash-all.bat" script which will setup the new system image for you!

Congrats! When the script is done, it will reboot your device and Lollipop will be running. It may take a bit for it to boot the first time.

More info: There sure is a lot more information you could read about this entire process, but that's not what this post is for. These are the minimal instructions (with appropriate warning) for most people wanting to do this. If anybody has some good resources to share, then please add them to the comments.

Now, are you ready to root your Nexus 4?

:)
~ Danial Goodwin ~


2014-11-13

Level Up - Java: What is Vararg?

I like to remember vararg as "variable-length arguments". You may see them parameterized as "foo(Object... objects)" or "foo(int... ints)" or maybe "main(String... args)". The triple-dot signifies the vararg, and the method that has them uses it as an array.

Example code:

/** Returns input as a comma-separated list. If input if null
  * or empty, then this returns an empty string. */
public static String convertToString(Object... objects) {
    if (objects == null || objects.length == 0) { return ""; }
    StringBuilder sb = new StringBuilder();
    for (Object object : objects) {
        sb.append(object.toString()).append(", ");
    }
   return sb.substring(0, sb.length() - 2).

2014-08-30

Level Up - Android: Speed up your Gradle build times with one-line!

Whether or not you are using Android Studio, Gradle build times are slow (especially when you don't have continuous automated builds (another discussion)).

Here's one way to improve the speed Gradle commands like `assembleRelease` is to enable the Gradle daemon. I've sped up my release builds by about 20%!

2014-08-26

Level Up - Paint.NET & Android: How to create new color palettes for Android Holo and Material design

If you work in Android and Paint.NET, here's some quick tips and resources to make both easier to work with. When designing graphics in Paint.NET, it would be really useful to have direct access to all of the Android design guide colors. So, here's how to save and load different color palettes in Paint.NET:

2014-08-18

Level Up - Android: How to get started with Unit Testing in Android Studio

Recently, I finally got around to implementing the native unit testing that is provided within Android Studio (not third-party programs like Robolectric). So, after reading a few different sources, the following is the bare minimum that I would have needed in order to add the basic testing features.

2014-08-13

Level Up - Android: How to get started with Android Wear and the Wearables Emulator

Recently, I started working on Android Wear for the first time. It's been fun playing around with the new platform and form factor. And, of course, the official Android docs that I read could be condensed further for absolute newcomers. So, in the typical fashion, I've created myself a cheat sheet that I would use next time I would want to learn the easiest way for how to best create Wearable apps.

I've open sourced all my code so far on GitHub. It includes how to first set up the virtual Wear device, connect to the handheld device, and how to have the app send and open a notification on the wearable.

https://github.com/danialgoodwin/android-wear

~ Danial Goodwin ~


2014-07-15

Level Up - Dev: Abstractions

Abstractions are great!

Except, when they aren't.

We use abstractions everyday in our code, and it's what allows us to create our programs. This post is just going to be a quick blurb on the downside to non-trivial abstractions, as motivated by reading: http://www.joelonsoftware.com/articles/LeakyAbstractions.html

It's a great read. And, in the interest of time, for now:
TLDR:
- All non-trivial abstractions, to some degree, are leaky.
- Abstractions fail, and you have to know the underlying pieces to understand how to fix it.
- Many great examples
- When there is some great new code-generation tool, learn how to do it manually first, then use the tool to save time.

Eventually, I'll write my own informative article about abstractions, but for now, this will have to do. ;)


And, as I like to say, make sure you remember to think for yourself. Don't do something just because somebody else did it. Don't let your excuse be that somebody else told you to do it.

~ Danial Goodwin ~


2014-07-02

Level Up - Dev: Modular Code

Modular code means that the code is easily reusable; It does not mean that the code has to all be in one file. That's what modules and libraries are for. ;)

~ Danial Goodwin ~


2014-06-27

Level Up - Dev: Codestyle Quote

    "Any fool can write code that a computer can understand.
    Good programmers write code that humans can understand."
    
      --- Martin Fowler, Refactoring: Improving the Design of Existing Code

~ Danial Goodwin ~


2014-06-23

Research says Work and Study Harder to be more Successful

Research shows that people who work and study harder tend to be more successful.


~ Danial Goodwin ~

ps - I have absolutely no sources to back this up, but it's something nice to believe in. ;)


2014-06-21

Book: The Inner Game

The actual title of the book that I just read is called "The Inner Game of Tennis", but this post is not about tennis.

This was a great read, and you should read this book if you play sports and have ever wondered why you play good one day and bad the next. This book may help you have a more consistent and higher gameplay.

I wrote a whole bunch of notes as I read, and you can read them on GitHub.

If it's too much trouble to click a link, then here's the TLDR (Too Long; Didn't Read) that shares just a few of the biggest points:

  • There is an inner game and outer game. There are already many great resources on the outer game.
  • During practice, analyze your movements (methods includes "feeling" it, mirrors, video playback) and don't try to force any change. During game play, just let it happen naturally; trust yourself.
  • Experiment with many different playing styles. The "right" style may be different for different people.
  • You still may need some good outer game practice in order to gain more from these inner game tips.
  • If you dislike competition, then you have the wrong idea about it.
  • When playing, if you have any anxieties or frustrations, then you aren't a player of the inner game.


And, if you have already read this book or any of the other "Inner Game" books, then I'd be happy to hear your biggest take-aways.

~ Danial Goodwin ~


2014-06-18

Level Up - Dev: Integer Overflow Not Overflowing

An integer overflow (or wraparound) occurs when a number larger than the max integer value or smaller than the min integer value is tried to be stored in the integer's memory. You could imagine a circular number line.

Ex: If you have an integer at the max positive value and add one, then the integer will wraparound and be set to the most negative value (if using a signed int. An unsigned int will wraparound to 0). And, vise-versa.

Today, I experienced a bug where I wanted to get a (signed) integer overflow, but unfortunately the int value was just going to zero instead of going to the negative numbers. Thankfully, I knew the memory/bit representation of int and was able to figure out what was going on.

Here is some simplified code, with only one small change:

    // Test #1 - has wraparound
    int wrap = 1;
    for (int i = 0; i < 34; i++) {
        print(i + ": wrap: " + wrap);
        wrap = wrap * 3;
    }

    // Test #2 - no wraparound
    int wrap = 1;
    for (int i = 0; i < 34; i++) {
        print(i + ": wrap: " + wrap);
        wrap = wrap * 2;
    }

Here is the relevant output from running the code above:

// Test #1 - has wraparound
...
13: wrap: 1594323
14: wrap: 4782969
15: wrap: 14348907
16: wrap: 43046721
17: wrap: 129140163
18: wrap: 387420489
19: wrap: 1162261467
20: wrap: -808182895
21: wrap: 1870418611
22: wrap: 1316288537
23: wrap: -346101685
24: wrap: -1038305055
25: wrap: 1180052131
26: wrap: -754810903
27: wrap: 2030534587
28: wrap: 1796636465
29: wrap: 1094942099
30: wrap: -1010140999
31: wrap: 1264544299
32: wrap: -501334399
33: wrap: -1504003197

// Test #2 - no wraparound
...
20: wrap: 1048576
21: wrap: 2097152
22: wrap: 4194304
23: wrap: 8388608
24: wrap: 16777216
25: wrap: 33554432
26: wrap: 67108864
27: wrap: 134217728
28: wrap: 268435456
29: wrap: 536870912
30: wrap: 1073741824
31: wrap: -2147483648
32: wrap: 0

33: wrap: 0

If test #1 were to continue, then the values would keep wrapping. If test #2 were to continue, then the values would stay the same at 0.

The easiest way for me to make sense of this experiment was to know that multiplying by a power of 2 (2, 4, 8, 16, 32..) is the exact same as a bit shift in the binary computer. And, the bits that made up the int were all just getting pushed out of memory in test #2 until there were no more set bits to manipulate. In test #1, more int memory bits are being flipped in order to continue the wraparound.

I would explain this at a lower level, but there are already many great resources for "bit representation of integer".


~ Danial Goodwin ~

ps - This post was mainly for myself and written quickly. If there are any questions about this, then I'd be happy to elaborate.


2014-06-04

Level Up - Android Dev: KeyboardlessEditTest

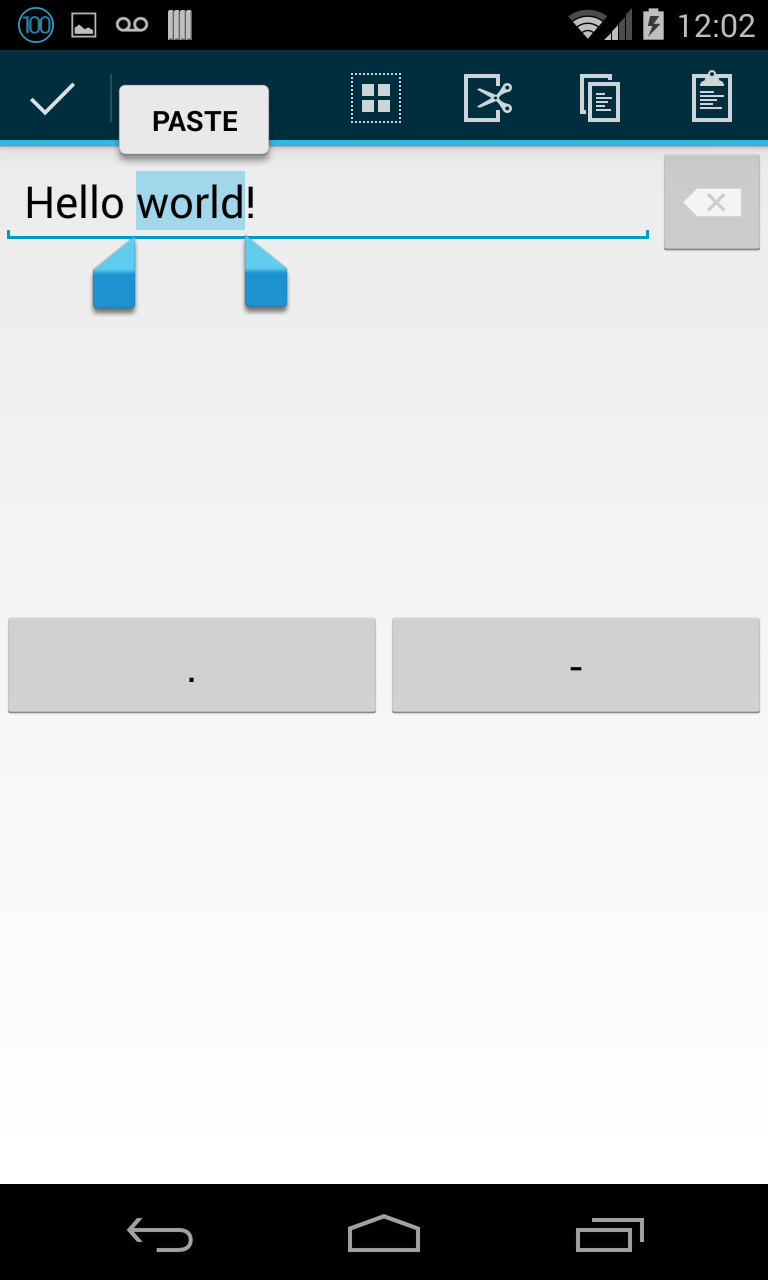
Today, I've released a new open source project that has help me build my latest app. I needed an EditText with full capabilities, except for the keyboard showing up. All of the possible answers that I found on StackOverflow and GitHub all had their limitations, especially the lack of native editing (cut/copy/select/paste) options.

All of the problems have been abstracted out to a simple subclass of EditText that you can use easily in any project.

You can try it out on GitHub now: https://github.com/danialgoodwin/android-widget-keyboardless-edittext
Or, you can go directly to test the APK: https://play.google.com/store/apps/details?id=net.simplyadvanced.simplytonegenerator

If you have any questions or need clarifications on how to use the project, then please let me know.


~ Danial Goodwin ~


2014-06-03

Self-Driving Cars are Horses

I just finished reading an article introducing me to the idea that riding horses and "driving" self-driving cars are similar. I expand on that idea here and introduce practical applications of that knowledge, i.e, a fun way to promote the cars and showing them to be practical.


Basically, one example precedent for self-driving cars is the horse. When horse-back riding, you can either choose to (1) Do nothing, (2) Provide gentle directions (3) Strongly urge a direction. When the rider is doing nothing, the mode of transportation can instinctively go somewhere. When the rider provides directions, the mode of transportation will do them at the earliest convenience, typically immediately. But, the ride won't run into a wall or crash into other rides (a sensible default).


Armed with this knowledge, I think it would be a fun idea to make a video commercial about this. First, the ending to a spectacular action scene, then have a closeup of a cowboy (read: horseback rider) texting and riding. Then zoom out to show all the hard work that the horse has to do to keep the rider safe, like avoiding potholes and other horses. Then, zoom out again to show a parent and child enjoying watching that video inside the self-driving car that is doing the same things.


Random follow-up questions:
- Do we need to hardcode into the car to want to always safe itself from crashing or having a certain threshold or acceleration and deceleration?
- Should the cars think all objects are immovable solids to avoid, or should it use more computer vision (CV) to determine densities (and object types), just in case? Ex: Run into brick wall or bushes?


~ Danial Goodwin ~


2014-05-29

Android: New Google Camera App


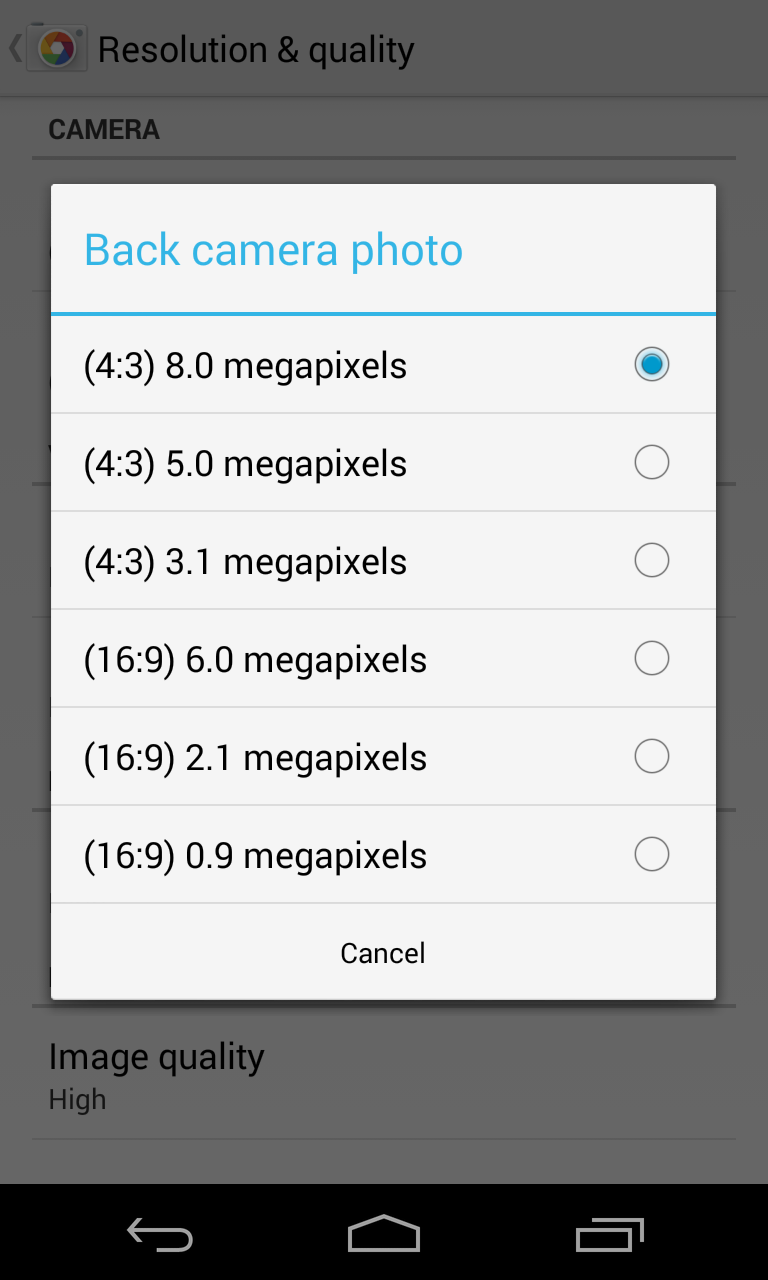
Good options for trade-offs between aspect ratio and size of each of the images for both the front and back camera.

~ Danial Goodwin ~


2014-05-02

(Game) Achievement Design

Fun little article I just read on Achievement Design 101.

The article mainly uses the game context to help explain good and bad achievement designs.

While reading it, I thought of a new game that I would like to see or create myself: The main idea is to have an RPG with skills for things that aren't in any other game. And, there would be plenty of achievements, like "You clicked on a button", "You made a choice. +1 to design making skill". and "You stood still! Great job!"


~ Danial Goodwin ~


2014-05-01

2014-04-18

Memory Match Theme Popularities Compared

Hi, here's my first go at building a Construct 2 (hybrid game app creation program) memory match template. I decided that I wanted to create many different versions to see which topics get the most popular so that I would spend more time developing the popular ones. So, which theme do you like the most?

Please try them all and let me know what you think. Or, maybe just 1-3 of the most interesting ones to you.

- Memory Match 3
- Memory Match: Roman Numerals
- Memory Match: Color Names
- Memory Match: Colors
- Memory Match: Numbers
- Memory Match: Alphabet
- Memory Match: Letters
- Memory Match: Wildlife
- Memory Match: Cartoon Animals


Results so far:
- Wildlife theme has the highest amount of downloads.
- Colors theme has second highest amount of downloads.
- Color names theme has second lowest amount of downloads.
- Roman numerals theme has the lowest amount of downloads. (Sidenote: These cards took the longest to create also, so good thing I didn't make more)
- My favorite, "Memory Match 3", is getting close to 100 downloads


This information could be good for any of your app that you may want to theme. Seems like people prefer the basics of wildlife and colors, rather than things that require more thinking like color names and roman numerals.. And, I have about 10 different versions that I need to organize.


~ Danial Goodwin ~


2014-03-22

Level Up!: Do Users Need To Click "I Agree" to TOS Button To Give Consent?

(TLDR: No. Courts decide these cases simply by whether the person had reasonable notice of the Terms & Conditions. If you have a website/app and plan on collecting personal info or just have customers in general, the I highly suggest you read more about this topic. Disclaimer: IANYL.)


As a UX designer, I try to make things that are as simple and painless as possible for users to use. One pain (and protection) that almost every product/app needs is a Terms of Service (TOS) agreement, aka Terms of Use (TOU), aka Terms And Conditions (T&C), aka End User License Agreement (EULA).

The current "best practice" for showing TOS to users is by providing a clear link near the "continue to use app" button (which could be a register or purchase button). This is so that most users don't have to go through the extra step of clicking "I Agree" to something that they likely didn't read. Also, having the TOS pop-up interrupts users' flow (and can sometimes be quite scary-looking).

But, unfortunately, before today, I never really thought about the legal consequences of the different methods to show users the terms and conditions. I just used methods that I noticed many other great UX designers and companies using. So, I wasn't able to explain the legal-ness (to my satisfaction) to concerned client.

I took it upon myself to take the time to do some research around this area and organize it into this post, with sources and references cited.

In my research, I have found that the courts also know that most users don't read the TOS, and clicking "I agree" doesn't mean that the user has read it. What the courts look for is mainly that the user has had the easy opportunity to find and read the TOS, if they wanted to.

There are two main ways that users "agree" to TOS:

  • Click-wrap Agreement, aka "click-through agreement": This means that users must take some sort of action that signifies their consent to the TOS. This action could be a button that says "I Agree". Also, near the call to action, it is sufficient to say "By [continuing], you agree to our Terms of Service", with the TOS having a direct link.
  • Browse-wrap Agreement, aka "not a contract": Basically, saying users agree to TOS by browsing website/app, and the link to TOS is not extremely easy to find in regular use. A link at the bottom of the website could be considered hard to find, especially when there are many other links down there too.


My Summary (Just from my research (links below), though more can always be done.)

  • If your app collects or uses personal information, then use the click-through (clickwrap) agreement.
  • Remove any clauses about unilaterally editing contract at any time.
  • Add ability for company to modify terms, with prior notice. [More research needed for exact words to use]
  • Add ability for users to reject TOS, e.g. by terminating account. 


A few sources I read, in order of my recommended readings (Yes, there is a "Good" before "Great", just because of what this post was supposed to be about):
 - Great: How Zappos' User Agreement Failed In Court and Left Zappos Legally Naked (Forbes)
 - Great: The Clicks That Bind: Ways Users "Agree" to Online Terms of Service (EFF)
 - Good: Terms Of Use And Privacy Policy Best Practices (UpCounsel)
 - Great: Website Terms and Conditions: Some Best Practices (JDSupra)
 - Miscellaneous, but good: Terms of Service; Didn't Read (TOSDR)
 - Good: Browse wrap (Wikipedia)
 - Okay: Clickwrap / Browsewrap Agreements: It’s the Notice, Stupid!

Further Reading:
 - Terms of Use and the Digital Millennium Copyright Act (DCMA)
 - Search "Clickwrap vs browsewrap"


Disclaimer: I am not your lawyer (IANYL). This post's only intention is to help point readers in the right direction to learn more about this topic.

~ Danial Goodwin ~


ps - Bonus info! The terms "click-wrap" and "browse-wrap" come from physical goods/software that was "shrink-wrapped". Manufacturers had license agreements that basically said users agree to TOS by removing the shrink-wrap. (Source: Wikipedia)


2014-03-21

How To Be A Good Programmer

Being a good programmer isn't about memorizing how to do everything. It's about being able to quickly research whatever you need to do.

~ Danial Goodwin ~


2014-03-19

Always Create an API When Programming

Every time you develop a computer program or app, you should basically be building an API.

Getting in the habit of this will vastly improve modularity of your code, which in turn makes maintenance and future additions greatly simplified.

And, imagine, if you ever want to reuse code from one project in another project, then with proper abstractions you will be able to just quickly import the file(s) and carry on without worry, theoretically. ;)

~ Danial Goodwin ~


2014-03-15

Challenge to Self: Daily Creativity

Challenge to self: Be creative at least once per day and share with the world.

ps - My more creative side can be found at http://chaoticdan.blogspot.com/ ;)

2014-03-12

Level Up - Puzzles: Four Random Cards, Turn All Face-Up, Blindfolded (Solution)

Problem:
You have four cards placed in a 2x2 grid pattern. Each card is randomly placed either face up or face down. Your goal is to flip all the cards face-up. But, there are a few restrictions:

  • You are blindfolded and never know which cards are face up or face down. Nor do you know how many cards are flipped either way.
  • Your movements for flipping cards are limited. Each turn you can flip either one or two cards.
  • You will only be told when all cards are face up. You will get no other notification on how the cards are orientated.

What are the fewest amount of turns required to ensure all four cards are (eventually) flipped face up? And how?


Ascii art on how the layout may look. Each card represents a card:
1 2
3 4

Sidenote: When this brain teaser was first told to me last week, the person explained the possible limited card movements as, roughly, "you can either flip the diagonal cards, a column of cards, or a row of cards. Or, you can flip just a single card.". I'm pretty sure the way I explained it ("each turn, you can only flip one or two cards") is the same and much easier to understand, so I guess that lowers the puzzle difficulty a little bit for you, the reader.


Solution: 

2014-03-11

Level Up - Puzzles: Connect a 4x4 Grid of Dots With 6 Contiguous Lines (Solution)

Before reading this post, you should read my last one which introduces the puzzles better.

A common brain teaser is to connect a 3 by 3 grid of dots with four straight lines without picking up the pencil. After solving a 3x3, try to solve a 4x4, 5x5, etc. I have a proof that all of them have a solution.
Click read more to see the solutions and explanations:

2014-03-10

Learned Experience

Many things learned are useful in other aspects of life.

Recently, I have learned a lot about business taxes and now personal taxes are so much easier to tackle. And, reading the IRS publications aren't that bad anymore. Prior to doing all of the business taxes research, I thought the IRS website and publications were overly complicated. Now, I consider each pub to be light reading even though they are small font, three columns per page, and typically around 5-40 pages.

I feel good.

~ Danial Goodwin ~


2014-03-08

Level Up - Puzzles: Connect a 4x4 Grid of Dots With 6 Contiguous Lines (5x5 w/8, 6x6 w/10)

(TLDR: After solving a 3x3, try to solve a 4x4, 5x5, etc. I have proof that all of them have a solution.)

A common brain teaser is to connect a 3 by 3 grid of dots with four straight lines without picking up the pencil. See image below:

2014-03-06

Published Two New Apps: Flappy Gravity and Gravity Runner

Using Construct 2, I've created two new HTML5 apps which run natively in Windows 8 and Windows Phone. I'd like to encourage you to try the apps. The links go to the store where you can see screenshots of the apps.

Gravity Runner
Gravity has gone crazy. There's only one hope... But, beware, the more times you change gravity, the more your power goes down.
- You are in control of gravity!
- Infinite, randomized levels
- Touch-enabled

Available now:
- Windows 8
- Windows Phone


Flappy Gravity
Gravity gone wrong! Change gravity with every tap! Avoid the obstacles.

2014-03-03

Level Up - Business: How To File the Annual Report (Florida)

When you run a business in Florida, you must submit an Annual Report every year between January 1st and May 1st. It will cost $138.75 to file. And, if not filed in time, then there is a $400 penalty fee and possibility that the company is "administratively dissolved". But, the good news is that the report is easy to fill out and submit, and it's all done online.

When you complete the form online, you'll be able to edit your business address and member(s) address(es). Then you don't need to file a separate form for changing the addresses with the state (an extra $25).

First thing is, you don't need to spend any extra money for a third-party to complete this state requirement for you. They may charge upwards of $35 to complete the form that is easily completed within five minutes.


To complete your Annual Report:
1. You will need, your business's document number, Federal Employer Identification (FEI/FEIN) or Employer Identification Number (EIN), an email address to keep on file, and about five minutes.
2. Go to https://services.sunbiz.org/Filings/AnnualReport/FilingStart
3. Start the form by imputing your document number, then read the directions on the page. It is all straight-forward.
4. Pay the filing fee and submit. Now, you are done.


Disclaimer: This is not legal advice. This post is mainly a pointer to help others who also need to Annual Report for Florida. I'm sure other states in the US also have a page similar to the one linked here.

~ Danial Goodwin ~


2014-03-01

Level Up - Business: How To Change Your Filed Information With The State Government (Florida)

If the information you have filed with the state has changed, then you are supposed to let the state government know about it. This blog post will simply point you to the page where you can find all the information that you need to change your filed emails, addresses, FEI/FEIN/EIN, your business name, and more.

For the state of Florida, you will need to go to the Sunbiz site at http://www.sunbiz.org/address_change.html.

Now that I have this information written down in my blog, next time I need to make a business change I will remember to just look at this post to find the link easily, rather than searching through the different government business websites.

~ Danial Goodwin ~


2014-02-27

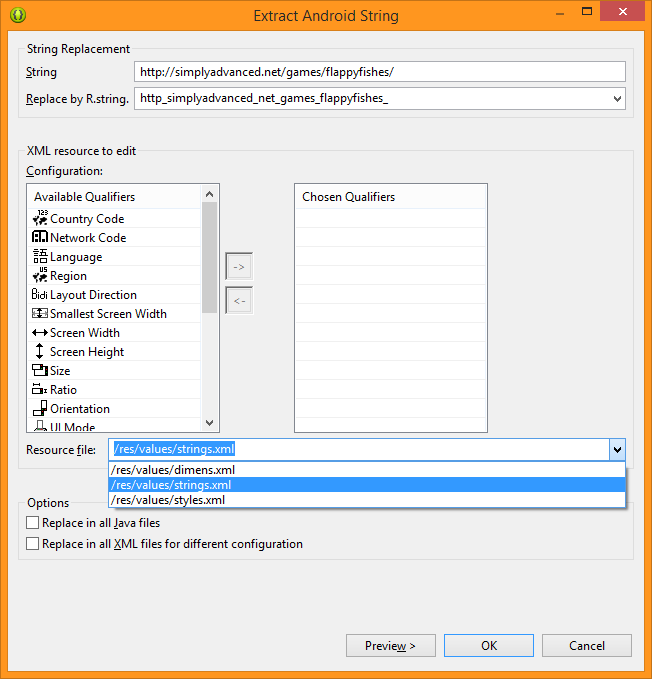
Level Up - Android Dev: How To Automatically Extract Hardcoded Strings To res/values/strings.xml

This is just one of the many refactoring features of Eclipse. Using this extract feature, you won't even need to open res/values/strings.xml to add the String resources nor manually write out reference to the resource.

This saves a lot of time, and allows the best practice of putting String constants away from the UI/Java files so that localization can be performed easier. This method I'm about to show you is especially productive because it can change all instances of that particular String to point to the xml string resource so that you don't have to do it individually one-by-one. (I'm doing maintenance on code that has everything hardcoded, so this is a lifesaver.)

To automatically extract the String, it's easy enough:

Step 1: Highlight the entire String that you would like extracted and sent to res/values*/strings.xml
Step 2: From the menu bar, select Refactor->Android->"Extract Android String..."
Step 3: Preview options and confirm changes.

Step 2: Automatically extracting string menu option.


Step 3: Many different great refactoring options to choose from.


This works in the XML and Java files for your Android application. And, this is much quicker than manually changing all instances of hardcoded Strings to getString() and @string/.


~ Danial Goodwin ~


2014-02-25

Level Up - Webmaster: How To Get Started With MediaWiki

Want to create your own wiki pages like Wikipedia? You can organize all your thoughts, add notes for your new book you want to write, and more. The wiki can be either public, private, or half and half. You decide.

Going through this process will allow you to edit any and all features that are provided with MediaWiki, the wiki engine for Wikipedia and many other wiki sites.


Step 1. Download MediaWiki, it might be as a .tar.gz file, which in that use 7-Zip to unzip the compressed file, you may have to use 7-Zip twice to fully open it and see the source files.

Step 2. Copy all the files to a directly on your domain.com/mediawiki/w/ directory. One of the easiest ways is using FileZilla, navigating to the public directory using the GUI, then click+drag all the files into the directory. Note: The reason I said that particular directory is because it will allow you to do a lot more later on, like setup the domain.com/wiki site to serve the pages in your wiki. As you wait for all your files to upload to your server,

Step 3. Create a new database and user for that database. This is the method that the MediaWiki instance will be using to save and retrieve all the information for your wiki.

Step 4. Wait until all the files have finished uploading to your domain.com/mediawiki/w/ directory, then navigate to that page in a browser. It'll say LocalSettings.php file not found, so this is where you will use a wizard to setup all the properties of your site, like public/private and more. Each of these properties can always be changed later. I recommend reading through all of them to understand better what is available to you.

Step 5. After going through the entire wiki, the wizard will prompt you to download the LocalSettings.php file which you can then add to the same folder that you previously installed all the files in.

Step 6. In a browser, navigate to your domain.com/mediawiki/w/ and see that you have your main default page show. Congrats, you now have an instance of MediaWiki running on your own server.


If you run into any problems during this process, you can click on the little question marks in the wizard to pop up more information of a section or input area. Another great source of information is on the official install page.


~ Danial Goodwin ~


2014-02-22

Published New App: Wall Ball

I just created a new game using a concept that I haven't seen in any other game. It's almost like a single player pong game with different objectives.

Using the Construct 2 game engine, so that I only have to create the code base once, I've made the game available for Windows 8 and Windows Phone.

Try it out now:
- On Windows 8
- On Windows Phone


~ Danial Goodwin ~


2014-02-21

Level Up - Construct 2: Don't Confuse "+" And "&"

I just spent over an hour debugging a problem in my Construct 2 code. Suffice to say the solution is now ingrained in my brain. Now, I want to explain a little intricacy of C2.

TLDR: In Construct 2, whenever you are dealing with text and you want to concatenate/append additional text (or a variable), then you need to use the ampersand "&" symbol. Using the plus "+" symbol will cause a silent error/bug, i.e. the program won't tell you that there is a bug. Ex: If I try to set text to "Score: " + PlayerScore, then the value of the variable `PlayerScore` will not appear. The correct way to set the text would have been: "Score: " & PlayerScore. Note, the only difference between the two codes was the plus and ampersand.

Other programming languages have "overloaded" concatenaters, meaning the "+" symbol in some languages like Java are contextual. Depending on the value to the right and left of the plus sign, it will act a different way rather than not working at all, as in C2.

In Construct 2, the only time that you should use the plus symbol is when you want to add two numbers together. That is it.

Anyways, the issue that I was trying to solve for over an hour involved using WebStorage and Functions with programmatically assigned parameters. Saving and retrieving values was working great, just not exactly the way I wanted it to. I had a highscores table for easy, medium, and hard difficulties, but they were all staying the same values across each of them. My buggy code included lots of ampersands surrounding the entire area, but basically, this is what it looked like: Save("HighScore" + LevelDifficulty, PlayerPoints). Note: The plus sign is wrong.

No programming languages I use have the ampersand as a String concatenate. So, when I viewed the code snippets a few times, even completely writing them, my mind knew exactly that String + String should be working.

If I hadn't already read the manual/documentation before this point, then I probably wouldn't have found the answer myself.


Experience built through learned mistakes.
~ Danial Goodwin ~

ps - Just in case I haven't said it enough yet... When you are using Construct 2 and dealing with text, use the ampersand, &. Don't use the plus, +, sign!


2014-02-20

Experience Publishing to Different App Platforms

Q: How do you gain experience in publishing apps to a certain platform?
A: You create 100 apps and publish them.

Q: How do you lose experience in publishing apps to a certain platform?
A: You create 100 apps and publish them. (Details below)

I don't think anybody actually asks the second question (but I just did!). Anyways, after the first few publishes, programmers/hackers get tired of the same routines. Our jobs are basically to automate things and makes things easier!

So, that's what I did and am doing. I'm starting to automate the entire process of publishing an app. There is this great tool that is a high-level scripting language called AutoHotkey. With it, I can easily open any program programatically, and send any keyboard and mouse commands that I want to the program. Basically, a macro builder for the entire end-user operating system.

About half of the process is automated now. I'm about halfway to my personal goal of 100 apps. My goal would be to make the entire process from app file to publish a one-click process. I know it's possible, and it'll be fun to build.

Once the process is all automated, I can be free to forget the process and start thinking of other abstractions to make.

;)
~ Danial Goodwin ~


2014-02-19

Level Up - Webmaster: How To Randomly Redirect Visitors To Different Websites

There is a very simple method using PHP to have visitors automatically redirected to another site.

Why this is useful:
- User clicks "Take me to a random" page. You can finely-tune the random outcome.
- You are doing some A/B testing and want to sent users to different locations to test.
- Or, like me, you want to share your various websites/games, from a single button.

Try clicking
Ex: http://apps.simplyadvanced.net/windows8/redirect

Step 1: Here's all the PHP code that you need:

$urls = array("siteA.com",
              "siteB.com",
              "www.example.com"); $url = $urls[array_rand($urls)]; header("Location: http://$url"); ?>

Step 2: Done

Or, if you want to redirect the visitor after they visit a certain URL on your domain, then simply create an "index.php" file in the public directory that you want users to be redirected from, then the above code is all that you need to put in it.

Try it: Random Windows 8 Games created by me.
Try it: Random Windows Phone Games created by me.

~ Danial Goodwin ~


2014-02-18

Published New App: One-Click Saga

Today (and yesterday), I created this "One-Click Saga" game using the Construct 2 game engine. C2 definitely allows great games to be created with ease.

Description:
Three games to master. Flappy's too tired to flap anymore, so he is taking a ride on different airborne vehicles. Rules are the same: tap to save the clone bird's life! But, in each game a tap does something different...

Available Now:
- Windows 8
- Windows Phone
- HTML5


~ Danial Goodwin ~


2014-02-17

Level Up - Programmer: How To Quickly Setup And Use Git And GitHub

A long time ago, the first time I started trying to learn Git and GitHub, I thought it was an unnecessarily complex process. All I wanted was simple version control and easy collaboration. So, instead of learning Git, I just made everything really modular. For one of my teams, we even just worked in completely different files, and it worked out okay.

But, now, I want to explain the absolute basics on how to start, in order to drastically reduce the learning curve. You can always find more detailed information later. And, you can get started right now!

Assumptions:
- You already know what Git is.
- You are running Windows OS.
- You already have folder/file(s) in mind for added a version control system to or want to do easy collaboration on code projects.
- You want to get started with GitHub.
- You are okay with basic instructions meant for the easiest use of Git/GitHub.

Git
Step 1: Download Git.
- Make sure you have "Git Bash" to be installed also, and you can add it to your [right-click] contextual menu also during the install process. (And/or you can add Git to your Path.)


Step 2: Configure Git.
- Open Git Bash (either right-click in file explorer or find it through search)
- Type the following two lines into the console, and change the red parts to your own information:
git config --global user.name "Your Name"
git config --global user.email "your@email.com"

Step 3: Setup project to work with Git.
- Navigate (using cd) the console to the directory where you want to enable Git.
- Run the following lines to setup the folder to work with Git and "save" all the files in the directory.
git initgit add . 
git commit -m "Initial commit"

And, now you have version control. Just do those last two lines again whenever you want to save a new version. Change the red part to something descriptive of the change.


GitHub
Step 4: Create a GitHub account.
- If this is your first time using GitHub, you will need to create an SSH key. After entering the following, hit enter again to save to default location (your user folder/.ssh).
ssh-keygen -t rsa -C "your@email.com"
- The console tells you where the public key has been saved. Open that file in Notepad++ and save the contents to GitHub.com->Profile->Edit Profile->SSH Keys->Add SSH Key. (Each arrow -> is basically another click.)
- Check for success by running:
ssh git@github.com

Step 5:  Create a new repository (sometimes called a "repo")
- Click the big green button somewhere on GitHub that says "New repository"
- Name the repo and create it.
- On the page you are navigated to, find/copy the "SSH clone URL". This will be used in the next step and looks something like, "git@github.com:danialgoodwin/MyFirstRepoNameHere.git"


Step 6: Pull From GitHub, then Push To GitHub.
- Setup the location that you will push to and pull from. The part in red should be substituted with your info from step 5. (The following should all be on one line.)
git remote add origin git@github.com:andrew8088/Shazam.git
- You always want to "pull" from GitHub before you begin your work because others may have updated the code:
git pull origin master
- Now, you can finally update your code to GitHub!
git push origin master


For more great information and details, please visit:
- Easy Version Control with Git
- Official GitHub site, there should be large buttons wanting to help you further.


~ Danial Goodwin ~


2014-02-16

Level Up - Creativity: Revamp Old Ideas

A thought just occurred to me, how am I going to describe the next game I create?

One requirement would have to be that the description entices visitors to download the game and try it..

So, I could try to be original, which I usually do try to do.. Or, a new strategy occurred to me: be original within the bounds of what people already know about.

Here's a few descriptions for new games off the top of my head:
- Bomberman, without the bombs.
- Flappy Bird, but you're a fish, and underwater, avoiding nasty underwater cactus.
- Flappy Bird + Bomberman = Try to blow up pixel birds.
- Pong, but one player and no computer opponent.
- Side-scrolling shooter


Maybe these aren't the most creative ideas, but they can work. For more creativity, assumption reversal usually works better. Post coming soon. ;)
~ Danial Goodwin ~


2014-02-15

Level Up - Webmaster: How To Shorten Default MediaWiki URL to Short (Canonical) URL Form

This was my first time shortening the URL for MediaWiki to canonical form and it literally took me less than five minutes to fully complete and test. I bet you can do it in two minutes.


Quick and easy directions:
1. Go to MediaWiki ShortURL Builder (Your wiki will have to be temporarily public)
2. Type in your current URL, for me it was " http://danialgoodwin.com/mediawiki/w/"
3. When you click "Go", make sure the article path says "/wiki/$1" or wherever you would like your MediaWiki to appear to users.
4. You now have all the code at your fingertips to place on your server. I used a GUI FTP client (like FileZilla) to transfer the new data because that was the quickest for me.


The Code:
If your configuration is the exact same as mine, then you can use these following sections of code to enable the shortcodes.

At the root of your domain, in the .htaccess file (make it if you don't have it), include (I added the "REGION" comments just for readability and future maintenance):
# REGION Redirects for MediaWiki Short Canonical URLs
RewriteEngine OnRewriteRule ^/?wiki(/.*)?$ %{DOCUMENT_ROOT}/mediawiki/w/index.php [L]RewriteRule ^/?$ %{DOCUMENT_ROOT}/mediawiki/w/index.php [L]
RewriteCond %{DOCUMENT_ROOT}%{REQUEST_URI} !-fRewriteCond %{DOCUMENT_ROOT}%{REQUEST_URI} !-dRewriteRule ^/?mediawiki/w/images/thumb/[0-9a-f]/[0-9a-f][0-9a-f]/([^/]+)/([0-9]+)px-.*$ %{DOCUMENT_ROOT}/mediawiki/w/thumb.php?f=$1&width=$2 [L,QSA,B]
RewriteCond %{DOCUMENT_ROOT}%{REQUEST_URI} !-fRewriteCond %{DOCUMENT_ROOT}%{REQUEST_URI} !-dRewriteRule ^/?mediawiki/w/images/thumb/archive/[0-9a-f]/[0-9a-f][0-9a-f]/([^/]+)/([0-9]+)px-.*$ %{DOCUMENT_ROOT}/mediawiki/w/thumb.php?f=$1&width=$2&archived=1 [L,QSA,B]
# ENDREGION Redirects for MediaWiki Short Canonical URLs

In your MediaWiki's LocalSettings.php file, insert the following lines (preferably right under "$wgScriptPath" and "$wgScriptExtension" just to keep things organized):
## Added for short URLs.$wgArticlePath = "/wiki/$1";$wgUsePathInfo = true;
## Added for short URLs because .htaccess on root includes 404 thumbnail handler config.$wgGenerateThumbnailOnParse = false;


Note: With this method, you don't even need a /wiki/ directory to make it appear that all the files are there. You should use this method so that when you make changes to the backend, the frontend will still be the same for users, search engines, and SEO. It also makes URLs easier to remember and more.

More detailed information: Manual:Short_URL

~ Danial Goodwin ~


2014-02-14

Level Up - Webmaster: Transfer MediaWiki Instance To Another Domain or Server

I just completed the process for the first time, so it is fresh on my mind. Provided here is an easy summary of the exact links and steps that I needed. I went from MediaWiki version 1.20 to 1.22.2.

MediaWiki recommends only transferring files/database between same versions. So, these steps will also quickly include updating the "old" wiki first before installing a new instance on the new domain.

This information is for small, non-customized wikis. For more important data, you should probably read Manual:Upgrading.

Upgrade to newest stable release (optional)
0. Check requirements by reading the release notes
1. Backup files and database. The different ways include SSH, FTP, and via phpMyAdmin. More info
2. Upgrade files. Latest version. One idea is to upload these new files in a different directory, then change the names of the two directories so that the new one starts serving the files.
2.1. Added back LocalSettings.php, Images folder, and custom extensions.
3. Upgrade database. For the web method, navigate to "/mw-config/index.php". Some requirement checks will be performed during the setup wizard process.
4. Test if successful.

Create MediaWiki instance in the new server/domain
0. Backup files and database if you haven't already done so in the first section.
1. Create new instance of MediaWiki on new domain.
2. Import old settings and files from old domain, and change link locations as appropriate.
3. Test.


More detailed info: Manual:Moving a wiki

~ Danial Goodwin ~


2014-02-13

Published New App: Flappy Fishes

(YAFBC = Yet Another Flappy Bird Clone)

I really wasn't going to make a copy, but then I did.

Available for:
- Windows 8
- Windows Phone
- HTML5 (slightly older version)

~ Danial Goodwin ~


2014-02-09

Level Up - Webmaster: Setting Up Your First Laravel Website Or App

(For webmasters, a continuation on my last post Level Up - Webmaster: Installing Laravel and Composer on Bluehost.)

This walkthrough contains all the instructions I would have needed on one page, rather than looking through twenty different pages. This is a blunt how-to for connecting to a database with Laravel and displaying information. At the end are links for more specific and advanced info.

The following has explicit instructions and commands for a shared hosting provider like Bluehost, but the instructions should be the roughly the same for other providers and setups. I suggest to follow the steps explicitly the first time through, then run through it a second time with your specific project's names.

0. This simple "tutorial" assumes that you already know a little bit about Laravel and have possibly read my first install and setup walkthrough.

Setup the database:
1. Create a database on your server with a user and password.
2. From your root project folder, edit app/config/database.php to match your new database credentials.
3. In your root project directory, run php-cli artisan migrate:make create_users_table
4. You should now have the file that looks something like: app/database/migrations/2014_02_09_195357_create_users_table.php. Edit the up() and down() function to look like:
    public function up()
    {
        Schema::create('users', function($table)
        {
            $table->increments('id');
            $table->string('email')->unique();
            $table->string('name');
            $table->timestamps();
        });
    }

    public function down()
    {
        Schema::drop('users');
    }
5. Now, back in the project root dir, run: php-cli artisan migrate
6. At this time, your tables in the database will be automatically created. Add some data manually so that we can test that retrieving data works.

Create a view:
7. Create a route (subdirectory pointer) in app/routes.php by adding the following code:
    Route::get('users', function()
    {
        $users = User::all();

        return View::make('users')->with('users', $users);
    });
8. Create two new views in app/views. Call the first one layout.blade.php and add this code:


Laravel Quickstart


            @yield('content')
        
    
Create the second view, called users.blade.php:
    @extends('layout')

    @section('content')
        @foreach($users as $user)
            {{ $user->name }}
        @endforeach
    @stop
9. Go to your doman.com/users and you should have all the user names from the database displayed on the page.


Note:
- If the php-cli command doesn't work for you, then try just php


More info: