This post is going to be one of my longer ones, but no worries. It still contains only the minimum amount of work needed to get done before you have the ability to publish.
Here's the official YoYo Games' GameMaker Setup walkthrough.
http://help.yoyogames.com/entries/22361996-Setup-GameMaker-Studio-for-Windows-8
It has some good stuff, but not good enough. You'll be back here in order to successfully publish the Windows 8 app.
So, in this walkthrough, I will show you how to properly create the Windows 8 application for upload, using GameMaker: Studio.
I'll assume you already have:
1. First of all,
make sure you have the proper GameMaker program. There are mainly two different ones to choose from. Choose one from
http://www.yoyogames.com/gamemaker/studio and you must pay at least the $49.99 in order to publish to Windows 8. You must also have Microsoft Visual Studios 2012 installed.
2. The second biggest problem is not choosing the right target platform. Currently, you must choose "Windows 8 (Javascript)" option from the Target menu near the top (see pic below). Note: If you are using GameMaker in Windows 8, then choosing this method is the only way to save the project too. Having a target of regular Windows causes an error.
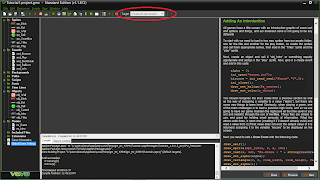 |
| Platform target menu circled in red |
3. Third, from the menu up top, choose File->Preferences->Windows 8. You should see something that looks like the following screen.
All this was setup for me automatically because I have created a Windows 8 app before. If these fields are not inputted, then please read
http://help.yoyogames.com/entries/22361996-Setup-GameMaker-Studio-for-Windows-8. I can't describe the Preferences screen better than that (towards the bottom of the link).
4. Now that the GameMaker Preferences are set up, it is time to setup you project's Global Game Settings.
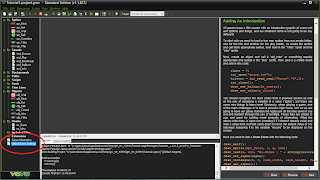 |
| Double-click to open the Global Game Settings |
This is where all other GameMaker to Windows 8 tutorials get messed up. What you need to do is open up Visual Studios 2012 and create a new basic Javascript project. It doesn't matter what you name it (for this tutorial let's call it GameMakerTest). Now, you need to reserve your app name (to ensure that it is available), associate the app with the store to get the package name, and create an app package to get the needed certificate. Where to find these options depends on if you have Visual Studios Express or Full.
4.1. To reserve your app name:
Express: In the menu bar up top: Store->Reserve App Name
Full: In the menu bar up top: Project->Store->Reserve App Name
(A new tab in your browser will open, titled "Submit an app")
Click on "App Name", which should be highlighted in blue in the middle of the screen. Then name your app. Your first choice may be taken already, so choose again. Remember this name because you will use it later back in GameMaker. Don't close this screen because you will use it again after inputting the details into GameMaker.
4.2. To associate app with the Windows Store and get the package name.
Express: In the menu bar up top: Store->Associate app with store
Full: In the menu bar up top: Project->Store->Associate app with store
Sign in with your Microsoft account. Navigate the screens and choose the one that app name that you just reserved for your GameMaker game. (Tip: The last screen shows some helpful information, like your publisher display name, if you don't remember it. You'll need to type that into GameMaker in step 5.)
4.3. To compile app and get a Windows 8 app certificate (to be used later in GameMaker):
Express: In the menu bar up top: Store->Create App Packages
Full: In the menu bar up top: Project->Store->Create App Packages
Sign in with your Microsoft account. You should see the app name that you just resevered, if not, then check the only checkbox that is there. You will need to know both the App Name and Package Identity in the Store. For this tutorial, I'm just going to say copy this information in your favorite text editor for now.
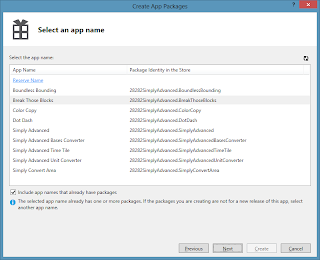 |
| Your names and identities will be different than mine. |
Highlight your app name that you want to submit. Click Next. Click Create. Click on the output location link so that the file explorer opens. Navigate one level up by clicking the up button. (You don't need to run the certification kit. It wouldn't work for you at this juncture anyways.)
The file you need here for GameMaker will be called
_StoreKey.pfx (Ex: GameMakerTest_StoreKey.pfx). Keep this file explorer open so that you know where to find this file later in GameMaker.
5. Bring your project in GameMaker to the front again. You should still have Global Game Settings open on the Windows 8 tab. I will now walk you through what should go in each of the options.
Display Name - Put in the App Name that your reserved using Visual Studios
Package Name - Use the "Package Identity in the Store" value here. I told you to write this in your favorite text editor.
Package Display Name - Basically, the short name for your Display Name. It can be the same or a condensed version of it.
Publisher Display Name - What is your publisher display name when you created your Windows 8 Developer account? (It probably cost $49, or free if you are a student)
Version - Doesn't really matter. Just make sure it is higher than your last submission.
Each of the images that you see on this screen should be updated before publishing to Windows 8. So, go ahead and do that now. Don't close this screen yet. Come back here after you finish.
Currently, you should be in the General tab of the Windows8 tab in the Global Game Settings. On the left side, click the Installation tab. This is where you need to navigate to the PFX file (Ex: GameMakerTest_StoreKey.pfx). After you do that, click Install. Windows PowerShell will pop up and things will start to look very technical. Just read the options and continue moving forward. Close the Global Game Settings when you are done.
6. All the hard steps are finished. Now it's time to go to the menu bar, File->Create Application. Save it to your location of choice.
Navigate to the location you created the application. Click on the folder, then AppPackages. The *.appxupload is the file you will submit on the Windows website that you should still have open in your browser if you followed this walkthrough word for word.
UPDATE: After running through it again, I found out that you don't need to do step 4.3 if you do step 4.2. Associating the app with the store creates the certificate key. But, I'm leaving step 4.3 in just because it is easier to navigate to the file that way. Just know that next time you do this, you can remember where you save the project to and skip a step.
Please let me know if this walkthrough helped at all or if I should put in any more information. I spent about an hour creating this... after first learning how it do it myself which took much longer. =]
~
Simply Advanced ~


